Well, here we are at Schoolism Painting in Painter Lesson 5, where we take a line drawing, and can color the lines, make shapes, fill with a gradient, and color them in. Now we were supposed to do this assignment using the drawing from Assignment 2, which for me was a St Bernard puppy with pigeon wings, drawn to paint fur and feathers.
Now this would be great except that, I drew the puppy looking at it stomach, meaning we see white fur on the belly, legs, feet, and much of the face, and most of the rest of the fur we see is black (the ears and facial mask)... all that lovely red St Bernard fur is hidden from view, and the pigeon wings are tones of white and grey. The only thing colored was the kong I put in her mouth.
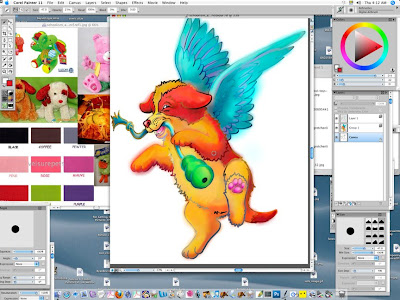
But what the heck, I can work around that, can't I? I decided to go for a stuffed animal sort of dog, and why not? Well, I tell you why not: I ended up with THIS horrendous painting!
OK, now that I have shocked your color senses, we'll take a look at the "however did we get there?". First I needed to make a line drawing from the greytone painting I had made of my puppy angel.
I started by opening up the painting in Painter:
And then I opened up the sketch, to get a line drawing basis:
I toned down the image brightness on the painting so I could see the lines, and copied the sketch lines on top of the painting, and added a layer on top of them in order to do my ink lines on it:
I chose the Bamboo Pen brush to make the clean black lines, thick enough that I would be able to color the actual lines in this assignment:
A couple close-ups of drawing the "ink" lines with the Bamboo Brush:
Lines all inked in:
I inserted a white-filled layer between my sketch/painting layers and the ink line layer (to block them from view), after which I dropped the layers:
I selected the lines using "Select-Auto Select-Image Luminance", copied and pasted, which gave me a new transparent layer with only the ink lines:
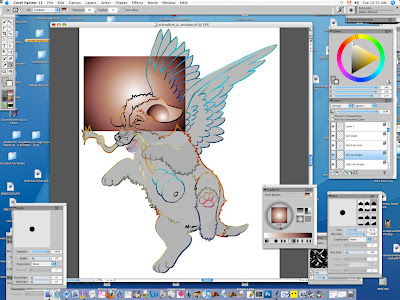
Then I began drawing shapes following the line drawing. At first I used the pen, and ended up with these dots that you can adjust the curves with, using little handles:
Turns out I am really bad at that, so I used the shape tool that just auto-traces as you move your cursor along the line, much like using the "select-lasso tool", except that it creates vector shapes. This was much easier, and I drew around the various shapes in my doggy: the body, the head, the legs, the ball, the wings. I made them as though they were separate pieces of paper that I would glue together to create my dog (ie I made the wings continue behind the body, rather than along the edge of the body).
Each shape automatically made its own shape layer, which I named so I could find where I was at:
Under Shape Attributes, I clicked "off" the stroke function (=no outline on the shape), and clicked "on" the fill function (filling with a flat grey tone) shape by shape, until the whole doggy was a collage of grey shapes on layers beneath the line layer:
When that was completed, I went to my line layer and started coloring in the black "ink line" itself using the airbrush. This was before I had my brilliant "let's make it a toy doggy with colors" idea, so I started off using a rust red where the dog's fur would be red:
And kept coloring in the other lines as per the colors I planned to put on the shapes: blue for the kong, various off-white/grey/blue/tan colors for around the fur, pink for the gums and tongue:
Blues for the wings:
Until I'd colored in all the lines everywhere:
Then I started filling the shapes with a spherical sepia gradient, to put highlights on where the light would fall on each form to create a 3D effect. You can see I was having issues at the start trying to get it right on the ear. If you make a rectangle, supposedly it should fill in just the shape, but the gradient scaled to the rectangle. It didn't work, but filled in the whole rectangle instead. When I clicked on the shape again, instead of refilling it correctly, it started making weird effects of balls, different colored dark spheres etc. Delete and started over!:
So I learned just to click once, on the spot I wanted the highlight of my sepia gradient to appear. Note that to fill the shapes like this, you must commit them to a layer (then they are pixels and no longer vector shapes):
Til I had the whole doggy filled in with sepia gradients. You can see a white spot by the back of her neck where I unsuccessfully tried to adjust the shape while it was a vector form, using the little handles on the points, and ended up with a wonky dip on the other side of the point from where I was trying to round it out. Also the far left front leg is not meeting the body properly:
Here I have adjusted the fit between the body layer and the front leg layer (putting the correct one on top), and used the airbrush to eyedropper the sepia tone on the back of her neck and fill in the missing white spot. And that is when I took a look at all that blue and greyish colored lines and realized I'd be painting grey, white, offwhite and more grey, with the exception of the kong and a wee bit of colour on her back:
So, that is where I got at the end of my first day. The next day I went a-googling and found my "furry puppy toy in bright colors" reference:
And started coloring in the shapes using Painter airbrush brush:
I started coloring in the kong, but there were so many layers that the computer was horribly slow:
So I flattened all the shapes into one by making a "group" of them, and then collapsing the group. So then I had just the original line drawing for background layer, the "shapes" layer, and the transparent layer with just the lines: 3 layers in all:
You can just see me continuing to color, rather garishly:
At this point I could see that I needed to adjust some of the lines better:
Here you can see I've used the airbrush on the lines to make them stand out better against the colors of the dog:
And finally, I used the eraser tool to clean up the overspray around the shapes:
So there you go: the final horrid garish drawing:
I considered it bad enough I didn't continue to fix the details, the textures, or the background. But decided to pick a line drawing I had done previously, that was more in line with the somewhat flat cartoonish line drawing character that our teacher, Ryan Wood, chose for his tutorial, and completely redo the assignment.
Look to the next post to see the continuing saga of Assignment 5 in Painting in Painter: Take TWO!


No comments:
Post a Comment